Setup Instructions
This guide will walk you through setting up your new iGateMini. There are two general steps during setup - Network Setup and APRS Setup.
Physical Setup
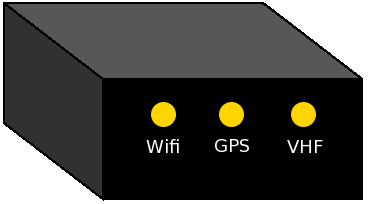
Carefully connect the VHF and WiFi antennas to their respective SMA connectors on the back of the device using the guide below. If you purchased the optional GPS antenna, attach it to the center SMA connector. Be careful to not overtighen the connectors, SMA connectors are generally torqued to only 3-5 in/lbf.
The GPS antenna is exteremly sensitive and should work well indoors but will work best if has a clear view of the sky and positioning it near a window will improve performance.
The included VHF antenna works well for local and high power signals but for best results and widest coverage an outdoor 2 meter antenna is highly recommended.
If you choose to use a physical network cable instead of WiFi, insert it now on the other side of the box.
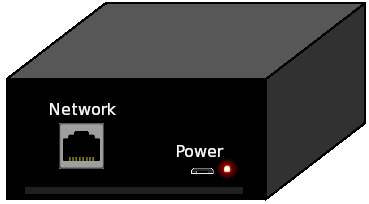
Finally, plug your micro USB power cable in. A 2 amp power supply is required. The red indicator LED should start to blink. The device takes about 60 seconds to start before it is ready.
If it is not connected to a network with a wire then it will flash the LED with groups of four quick flashes while it scans the available WiFi networks. When ready it will flash it's ip address.
Network Setup
Note: If you are using a network cable you can skip this section and continue with Connecting to your iGateMini
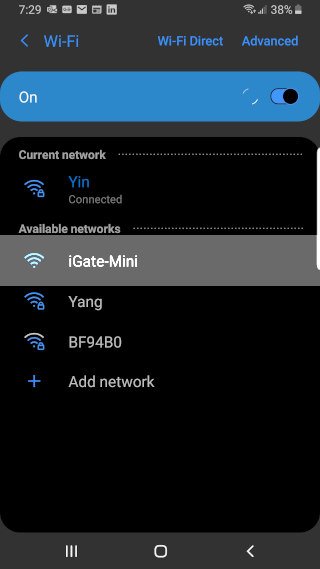
You device will start an internal WiFi access point and you can connect to it as you would any other Wifi network. Go to your WiFi settings on your phone and you will see an access point named iGateMini. Connect your phone to the iGateMini access point. You can ignore any messages from your phone that you may not have internet access, this is normal.
Once connected use your phone's web browser and navigate to http://igatemini.local. If you get a page not found error try http://192.168.200.1. You will first see the devices status page. Use the navigation at the top and choose Network.
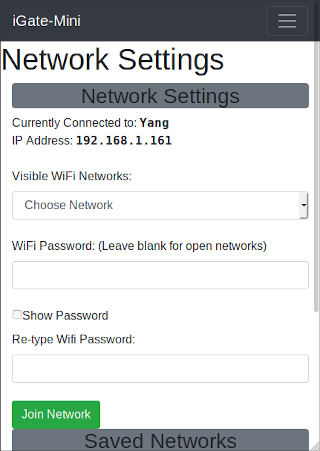
Select the WiFi network you wish to connect to and enter the password twice. Then click Join Network. The device will reboot and attempt to connect.
If for any reason the iGateMini cannot connect to the chosen WiFi network it will again start it's access point. A good way to verify that it connected is to open the WiFi settings on you phone to see if the iGateMini access point shows up. If it does then go ahead and connect to it and try joining your WiFi network again. If it doesn't show up then the iGateMini successfully connected to the WiFi network.
Connecting to your iGateMini
On most networks you can simply type http://igatemini.local into your web browser and the status page will show. If however that does not work you will need to find the devices IP address. Click here for instructions how to do that. Once you have the IP address you can then use that in your browser. For example, if you find the IP address is 192.168.1.44 then enter http://192.168.1.44 into your browser.
APRS Setup
Once connected, click on Configure in the Navigation menu at the top of the page

One this page you can choose the VHF radio frequency to listen for APRS packet. 144.390 is the standard in North America however it may be different in your location. Click here to see the most common frequencies used. Note that UHF frequencies are not supported.
APRS MyCall is the callsign that will show on the APRS network. It's customary to use your amateur callsign and add a dash and a number. It's suggested that APRS iGates identify with a "-10" but it is completly optional.
IG Login is the callsign the APRS network will use to identify who is sending them postion reports. Use your plain callsign here.
APRS Passcode. The APRS network requires a passcode in order to accept reports from you. This field is automatically filled in as you enter your callsign.
IG Server. Choose the server area closest to you for best performance.
Beacon Interval. This is how often the iGateMini will report its presence and postion to the APRS network. If you are stationary 30 minutes or longer is acceptabe. Sending them too often causes excessive traffic on the network. However if you are moving, say in a car, you may want this to be more frequent.
APRS Comment. Add your own comment that will be included when your device beacons to the aprs network. (Up to 40 characters)
Use GPS. Select this option if the GPS antenna is being used. Your iGateMini device will know it's location at all times from the GPS. The GPS antenna may work indoors but for best results it needs a clear view of the sky. View the status page to check if the GPS has acquired a fix The following postion settings are ignored if the GPS option is selected.
If not using the GPS option you can enter your postion using the options below
Enter grid square If you are not sure of your precise longitude and lattitude you can enter your gridsquare here and your position will be filled in for you. Note however that the position will be set to the center of the gridsquare and not necessarily your exact postion.
Longitude and Lattitude Enter your precise lattitude and longitude in the appropriate boxes. The format is decimal - ddd.dddddd
Satellite Filter. Normally you only want to report stations after they've been repeated by a satellite. If they were reported during the uplink, then the repeated packet would get dropped by the APRS network as a duplicate. This filter is used to prevent reporting stations during the uplink. For example, to filter packets going to the ISS enter RS0ISS*,ARISS For a more in depth discussion please see section 9.6.3 (page 101) of the Direwolf manual.
Privacy
The iGateMini is an RX only APRS iGate and as such it reports packets received over the air and reports to the APRS network using the callsign entered above. In addition, it periodically reports it presence to the APRS network using the callsign and location entered above. Finally we collect device health and performance metrics such as cpu utilization and temperature, up time and system logs. Since configuration files are included in this collection, your callsign may be included but be advised that we do not use it for anything other than device identification. We will never sell (or donate) any of the data collected without your consent. We collect these health report in order to improve device functionality and to help users when technical support is needed.
If you wish to opt-out of sending health and statistics to us simply check the 'Opt out' checkbox on the configuration page.
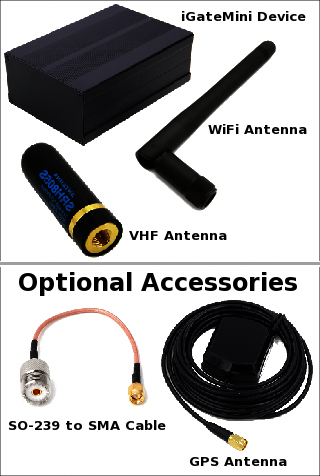
What's In The Box?
You should receive the iGateMini device itself, a stubby VHF and a 2.4GHz WiFi antenna. You may have optionally received a wired GPS antenna and/or a SMA to SO-239 adapter.